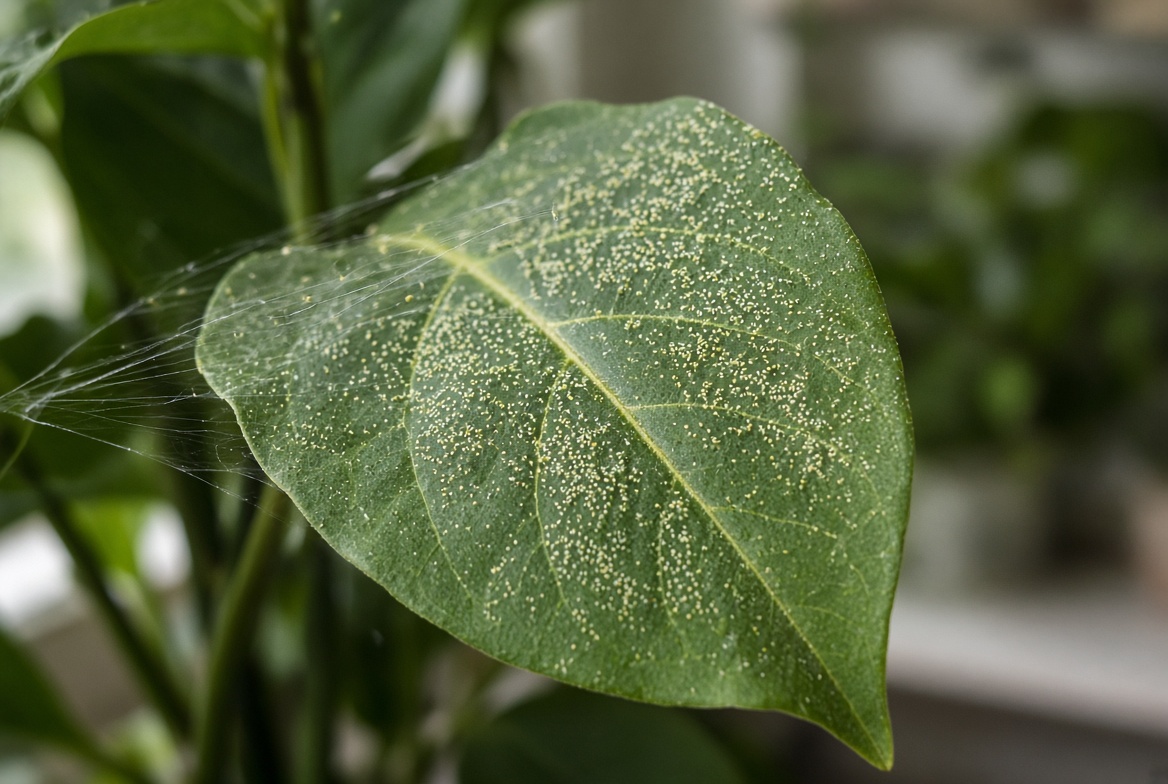
Spider mites can damage a houseplant for quite a while before most people notice an actual mite. They are extremely small, usually gather on the undersides of leaves, and often reveal themselves first through changes in the foliage rather than through obvious crawling pests.
The earliest damage usually looks like fine pale speckling scattered across a leaf. As feeding continues, those tiny marks can merge into larger faded, yellowish, bronzed, or bleached areas. Fine webbing may eventually appear between leaves, along stems, or around growing points, but waiting for webs before checking a suspicious plant gives the population time to increase.
Spider mites reproduce quickly under favorable conditions, particularly in warm, dry indoor environments. Colorado State University Extension reports that their life cycle can be completed in roughly one to two weeks under suitable conditions, which helps explain why a small infestation can become difficult to manage surprisingly fast.
Spider Mites Aren’t Actually Insects
Spider mites belong to the arachnid group, making them more closely related to spiders and ticks than to aphids, whiteflies, or other common houseplant insects.
The two-spotted spider mite, Tetranychus urticae, is one of the main species found on houseplants. Adults are tiny enough that magnification is often needed to see their body shape clearly. University of Minnesota describes them as roughly 1/50 inch long, while Maryland Extension notes that plant-feeding mites can appear pale, yellowish, brown, orange, red, or other shades depending on the species and life stage.
Their size makes identification from appearance alone difficult. The feeding pattern on the leaves is often easier to spot.
The First Sign Is Often Fine Speckling
Look closely at a damaged leaf and you may see dozens or hundreds of tiny pale dots. This pattern is called stippling.
Spider mites pierce individual plant cells and feed on their contents. As more cells are damaged, the leaf develops a finely mottled or faded appearance. University of Maryland lists this fine stippling as a characteristic spider-mite symptom, while Iowa State describes early damage as tiny yellow-green speckles that become more obvious as feeding increases.
Early stippling can easily be mistaken for a watering, nutrient, or light problem, especially from across the room. The pattern becomes more suspicious when the pale dots are concentrated on leaves that also have tiny moving specks underneath them.
Older damaged leaves may eventually turn yellow, bronze, tan, or brown and can drop from the plant.
Webbing Usually Means the Infestation Has Progressed
Fine silk around a houseplant is one of the better-known spider-mite signs, but it shouldn’t be the symptom you wait for.
University of Minnesota notes that webbing appears with heavier infestations, and its houseplant guidance says spider mites can be difficult to notice until populations are large enough for webbing, leaf damage, and the mites themselves to become obvious.
Spider-mite webbing tends to be extremely fine. It may stretch between leaves, cover parts of a stem, or collect around leaf joints and growing tips.
Dust and ordinary household spider webs can cause confusion. If you see suspicious webbing, inspect the leaves for stippling and use the paper test rather than relying on silk alone.
The White-Paper Test Can Find Mites Before You See Webbing
One of the simplest ways to check a houseplant for spider mites requires nothing more than a sheet of white paper.
Place the paper beneath a leaf that looks faded or speckled, then tap or gently shake the leaf. Watch the paper closely for tiny specks that begin moving across the surface.
University of Minnesota recommends this method for suspected spider mites, as do Iowa State and Colorado State.
A magnifying glass or phone macro lens can help after something falls onto the paper. You may see tiny oval mites rather than insects with an obvious head, wings, or long antennae.
Do the test on several leaves, especially ones showing early discoloration. A single clean leaf doesn’t prove that the entire plant is mite-free.
Check the Undersides Before the Tops
Spider mites commonly build colonies on the lower surfaces of leaves, where they are less noticeable during routine watering.
Turn suspicious leaves over and look along the veins and near the point where the leaf joins its stem. With magnification, you may find moving mites, eggs, pale cast skins left behind as mites develop, and tiny dark waste spots.
University of Minnesota specifically recommends examining the underside of discolored foliage, while its indoor-plant pest guide lists amber-colored eggs, whitish cast skins, and dark fecal specks among things that may be visible around an infestation.
This close inspection is worth doing before spraying anything. Thrips, scale insects, nutrient problems, drought stress, and other disorders can also cause faded or damaged leaves, but their treatment isn’t necessarily the same.
Spider-Mite Damage Can Look Like a Thirsty Plant
Mite feeding can leave leaves faded, dry-looking, yellow, or brown, which makes drought stress an easy misdiagnosis.
University of Minnesota specifically warns that spider-mite symptoms can be confused with drought damage.
Check the potting mix before responding with more water. A plant can have spider mites while its roots are already adequately moist, and repeatedly soaking the soil won’t remove mites living on the foliage.
On the other hand, badly dehydrated plants tend to tolerate mite feeding poorly. The goal is normal watering for the species, not keeping the pot constantly wet in an attempt to discourage mites.
Move an Infested Plant Away From the Collection
Once spider mites are confirmed, separating the affected plant from nearby houseplants reduces the chance of spreading them while you work on the infestation.
University of Minnesota recommends isolating indoor plants when pests are detected. It also advises cleaning hands and tools after handling infested plants because pests can be moved between plants on hands, clothing, and watering equipment.
Inspect nearby plants even if they still look healthy. Pay particular attention to plants whose leaves were touching the infested one or that sat immediately beside it.
Palms, ivy, figs, dracaenas, hibiscus, and scheffleras are among the houseplants frequently associated with spider-mite problems. Colorado State lists several of these as common hosts.
Start Treatment With Water
A shower can remove a surprising number of spider mites from a sturdy houseplant.
Move the plant to a bathtub, shower, sink, or suitable outdoor area and rinse the foliage thoroughly. Direct water toward the undersides of the leaves as well as the upper surfaces because that is where many mites are feeding.
Iowa State, Colorado State, Clemson, and Maryland Extension all recommend washing or forceful water sprays as a way to reduce spider-mite numbers.
The spray should be strong enough to dislodge mites without shredding delicate foliage.
Large-leaved plants that are difficult to shower can also be wiped carefully with a soft damp cloth. Remove badly damaged leaves if they are heavily infested and the plant has enough healthy foliage remaining.
One wash usually isn’t the end of treatment because mites and eggs can remain hidden on the plant.
Insecticidal Soap and Horticultural Oil Are Common Next Steps
If mites remain after washing, insecticidal soap or horticultural oil labeled for the plant and for mite control are common home-use options.
These products work mainly through direct contact, which makes coverage much more important than simply misting the visible top of the plant. Spray leaf undersides, stems, leaf joints, and other places where mites are likely to hide, following the product label exactly.
University of Maryland’s 2026 mite guidance lists insecticidal soap and horticultural oil among lower-toxicity contact treatments. University of Minnesota also identifies soaps and horticultural oils as common choices for two-spotted spider mites.
Contact products have little or no residual action once dry, so mites missed during the first application can survive.
That is one reason follow-up treatment matters.
Don’t Replace Insecticidal Soap With Dishwashing Liquid
Homemade dish-soap sprays are frequently recommended online, but they aren’t the same product as horticultural insecticidal soap.
University of Minnesota advises against homemade soap mixtures because they can injure plants, and Iowa State has also stopped recommending ordinary dishwashing detergent as a substitute for commercial insecticidal soap.
Household detergents can contain degreasers, fragrances, and other ingredients designed for dishes rather than living foliage.
If you choose soap treatment, use a product labeled for use on plants and follow its mixing and application instructions.
One Treatment Is Rarely Enough
Spider mites develop quickly, and treatments may not kill every life stage or reach every mite hidden beneath leaves and webbing.
Colorado State notes that many mite treatments don’t affect eggs, while Clemson and Iowa State recommend repeated treatment when mites persist.
The exact interval should come from the product label because products differ. Between applications, continue inspecting the plant with the white-paper test rather than assuming the mites are gone because you no longer see webbing.
Pay attention to new growth as well. Old stippling won’t disappear after the mites die, so existing damaged leaves aren’t a good measure of whether treatment worked.
A declining number of moving mites and clean new foliage are more useful signs.
Higher Humidity Can Slow Mites, but It Isn’t a Cure
Spider mites tend to do particularly well in warm, dry conditions. University of Minnesota describes dry, warm indoor environments as favorable to them, while Maryland Extension notes that higher humidity may discourage some mite species.
Increasing humidity around a humidity-loving houseplant may make conditions less favorable for mite population growth, but humidity alone isn’t enough to clear an established infestation.
It also shouldn’t be pushed so high that you create separate problems with poor air movement, leaf disease, or constantly wet growing conditions.
Normal plant care still matters more than trying to turn the room into a humid enclosure.
Be Careful With Broad-Spectrum Insecticides
Spider mites aren’t insects, so an insecticide sold for ordinary houseplant insects isn’t automatically useful against them.
Maryland Extension warns that some insecticides can actually make mite outbreaks worse, partly because they kill predatory organisms while failing to control the mites well. Colorado State gives a similar warning and recommends checking whether the pesticide is specifically labeled for mite control.
Don’t assume that a stronger-smelling or broader pesticide gives better control.
If washing, insecticidal soap, or horticultural oil isn’t working and you are considering another pesticide, verify that the label lists mites and permits use on the plant you intend to treat.
When Saving the Plant May Not Be Worth It
A lightly infested plant caught early is a much better treatment candidate than one covered in webbing with widespread bronzed and dropping foliage.
Heavily infested plants can remain a source of mites for the rest of the collection even while treatment continues. Iowa State, Maryland, Colorado State, and Clemson all note that discarding severely infested plants can sometimes be more sensible than trying to restore them.
The decision depends partly on the plant. A rare or sentimental specimen may justify a long treatment attempt, while replacing a small inexpensive plant may save weeks of repeated spraying and reduce the risk to dozens of healthy plants nearby.
If you discard an infested plant, bag it before carrying it through areas where other plants are growing.
Check New Growth Before Declaring the Mites Gone
Spider-mite treatment isn’t finished when the webbing disappears.
Continue doing the white-paper test and checking leaf undersides for several weeks. Look closely at the newest foliage because old feeding marks remain even after the mites responsible for them are dead.
New leaves emerging without fresh stippling are encouraging. Continued moving specks on the paper mean the population is still present and treatment needs to continue according to the method and product being used.
The easiest spider-mite infestation to control is the one found before the plant becomes covered in silk. A few pale speckles on a leaf may not look dramatic, but checking them early with a sheet of white paper can save both that plant and the ones sitting beside it.
Also Read: